


Sharing is caring!
I finished my plywood plank ceiling and I LOVE it! I wanted to cover my studio ceilings with pine tongue and groove planks like I’ve done in most of the main level of my house. I’m able to get Pine tongue and groove planks for about $2.25/sq ft so it was going to cost about $3000 to do my studio ceiling. I didn’t want to spend $3000 on my studio ceiling. I figured if I was willing to put in a little more work I could create the look I wanted for much less. And I did. I spent 37¢/sq ft on my ceilings for a grand total of less than $400. Boom!
This post is sponsored by Zircon Corporation

V Groove Plywood Plank Ceiling
I purchased 4×8 sheets of 1/4″ plywood underlayment and ripped them down. Right now (in my region) 1/4″ cabinet grade plywood is $29 per sheet but 1/4″ plywood underlayment is only $11/sheet. I’ve purchased the underlayment many times for cabinet backs. One side is very smooth and it’s actually quite pretty. If I didn’t paint everything I’m sure I would have pointed it out before now. 😉

I ripped the sheets down to just under 6″ wide strips. Each 4×8 sheet produced 8 planks.

After cutting all my strips, I set my blade to 45º and ran each strip through again…and again, beveling each side of each plank. The important thing I had to remember was to always have the “good side” facing down while beveling the sides. I’m using a MicroJig GRR-Ripper to push the planks through the saw and keep my hands safely away from the blade.

After beveling, (and flipping it over, right side up) this is what a single plank looks like. It took me about 15 minutes to rip down each 4×8 sheet and bevel the sides creating 8 planks.

I’m installing my plywood plank ceiling perpendicular to the ceiling joists so I needed to find those. To find studs or joists, there’s always the ole’ “knock and listen” or resort to the “drill a bunch of holes until you hit something” method.

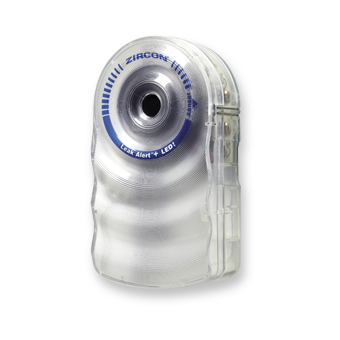
I prefer a good stud finder and my Zircon stud finder is the best I’ve ever used so I’m super happy to have Zircon sponsoring this post! The stud finder shows you the exact center of the studs as you pull it across the wall.

This one is extra cool. As you pull it across the wall, it shows you the location of each edge as well as the center so there is no confusion of where you need to nail or screw to hit the wood behind the sheetrock.

Pencils break constantly when trying to mark on this bumpy texture so I used a soft tip a marker to mark the location of my ceiling joists.

Since my studio has three different sections of ceilings I had to do a whole lot of stud finding. I marked the stud location on both sides of the flat portion of the ceiling and at the top and bottom of the slanted ceiling sections.

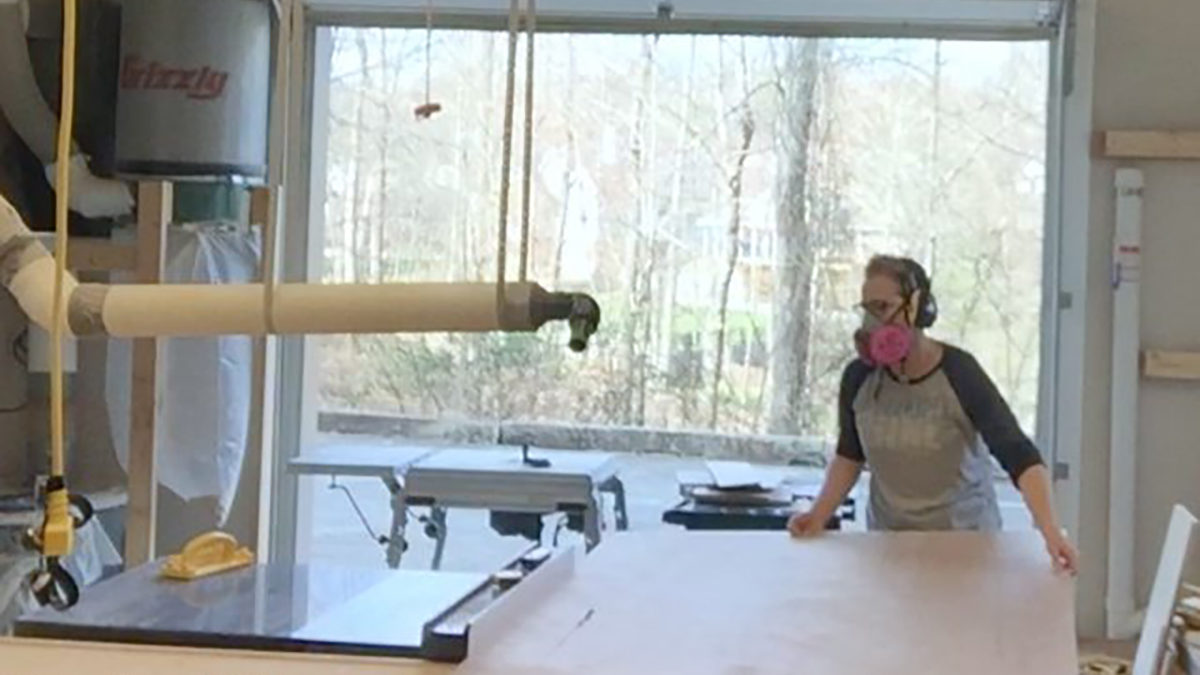
I’m too impatient to wait for help unless I absolutely need it so I used a level as a straight edge to draw a line from top to bottom marks on the slanted ceiling. I then proceeded to install the plywood plank ceiling all by myself because I really wanted to get started and SEE what this ceiling would look like. It was all just an idea in my brain and I wanted my eyeballs to get involved so I could decide if it really was going to look like…what I wanted it to look like.

I’ used construction adhesive and nails to attach the planks. I shoot nails only into the joists which is why I needed to mark the location. I spent almost 3 hours on a very small section before deciding I needed assistance. The planks are 8′ long and it’s difficult to manage on your own.

When Wes got home from work it only took us 1/2 hour to install over twice as much as I had done on my own. This is definitely a two person job.

I had Penny help me finish the remainder of the ceiling. With two people, snapping a chalk line is the easiest way to mark the location of the ceiling joists across the entire ceiling.

These lines let us know where to shoot our nails in each plank.

For the most part we flew through applying glue and nailing up the planks. Each plank is simply butted up to the next one. The bevel on both planks forms a V when they are combined.

I cut out the light and vent holes with a jigsaw.

For the lights, I used a template that came with the recessed cans to ensure I cut out the correct size hole.


I did not stagger my planks but rather installed them in 8′ wide sections. I’ll cover the seams where the sections meet after I prime and caulk. I shared a lot of pictures of this process on Instagram and facebook and a lot of people loved the look of the bare plywood plank ceiling and you could certainly leave it bare. My ceilings are only 8′ tall at the tallest point and I always planned to paint them white to make them feel taller and make the room feel more open, larger, brighter…

Before painting I filled all the nail holes and sanded. Then I primed.

I sprayed both the primer and paint with my airless sprayer. I used a 515 black tip in the orange nozzle that came with the sprayer for both as well.

After priming I sanded all the V grooves. I started out sanding by hand with a sanding sponge but that was way too much work. The cut plywood edges were quite rough and even with Penny and I both working on it, we were not making much headway. I ordered a Festool Linear Sander on Amazon and in two days I was sanding like a boss.

After sanding Penny and I caulked until our fingers bled, literally. What roughness I couldn’t sand away, we covered with caulk. Squeeze in a large bead caulk and spread that into the groove with a wet finger. Follow that up with a damp sponge and move on to the next groove.

After the caulk dried I applied a coat of paint. Then Wes helped me install my boards that would cover the seems. I bought primed pine 1×5 for this. I would love to have put up chunky beams but … low ceilings and all. The 1x’s will have to suffice. I applied another coat of paint and now it’s done!
In case you were wondering…to protect the light sockets, I wadded up plastic grocery bags, shoved them up into the cans and secured them with some painter’s tape.
Here is a close up of the V Grooves after all that. My plywood plank ceiling looks almost exactly like my 1×6 Pine tongue and groove ceilings I have elsewhere in the house. But for a fraction of the cost.
I couldn’t be more pleased with how it turned out and the fact that I spent less than $400 on materials puts me over the moon. Even with the additional cost of the $400 sander and the $80 laser level I bought for this project I’m still $2000 under what the Pine tongue and groove ceiling would have cost me. Which is great because I still have a lot of materials to buy for other projects.
I’ve still got a long way to go but every day is exciting!
Big thanks to Zircon Corporation for partnering with me on this project. Follow Zircon on facebook for great tips, projects and ideas!
Sharing is caring!